


Electric hot water tank anode.
No, this is not evolving into a household hints and tips web site but we encountered such a challenge finding reliable information and carrying out this "routine" task that we thought the experience should be shared.
Gradually, over time, we had noticed that our otherwise pristine (Think Holmestead Springs!) well water appeared to be deteriorating - at least when it came out of the hot water faucet. A rusty stain had appeared at the dishwasher water inlet and so on.
There were calls for some sort of (expensive) water treatment system or at least the installation of a new hot water tank.
After extensive investigation the actual cause of the problem was pin-pointed - it was believed to be a deteriorated sacrificial anode. Asking several local plumbing types and other appliance specialists for further information or where to obtain such an item drew plenty of blank stares...
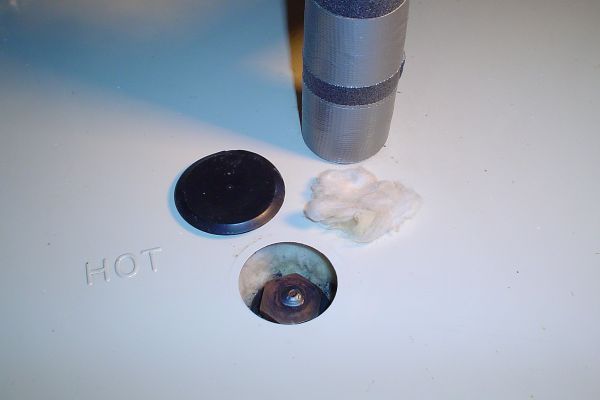
Typically the electric water heater has a hidden plug where the sacrificial anode rod is installed. The function of the rod is to protect the tank itself from corrosion. As the rod works, it slowly dissolves over time and must be replaced.
We finally found the replacement anode that we required hidden among some old stock in a plumbing supply outlet. It was the only one. I can't help but reflect upon all those hot water tanks that have been disposed of for want of a C$25 part!
If the anode has rotted away such that it is less than 3/8 diameter, or has any exposed bare steel core then it needs to be replaced.
Depending on water conditions, an anode can last from one to ten years but many localities treat their water, which can have significant effect on the life of your heater and the anode. Sometimes water conditioning may accelerate the rate at which the anode rod is consumed. In other words, checking the anode should be a routine maintenance task.
To proceed with the operation to check or replace the anode:
1. Turn the electrical supply to the water heater "OFF" This is probably on the main breaker panel. As a tip consider doing this a day or two before working on the anode replacement as the water will remain hot for a long time.
2. Close the cold inlet supply valve to the hot water tank.
3. Open a hot water tap close to the heater such as in the laundry. It may be a good idea to also open a tap at the highest point in the house.
4. At this time partially drain a little water from the tank as the weight of the remaining water will help keep the tank from moving as the anode is loosened. Later it can be completely drained and flushed as required.
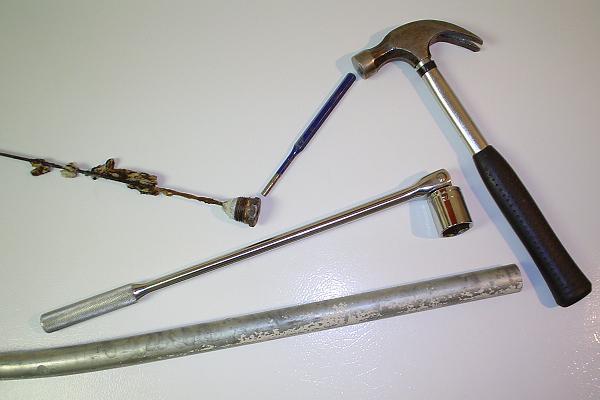
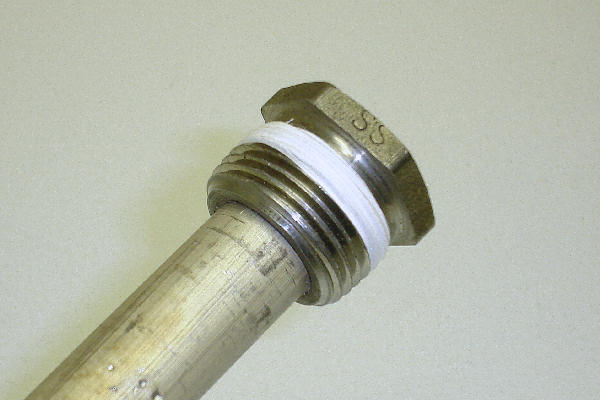
5. Using a 1 1/16" socket, remove the anode and inspect or replace it as required.
That last part is definitely a trick! The plug (or nut you access) is set very tightly into the tank itself and there is no packing washer of any sort as it must be a watertight seal and also provide electrical continuity to the steel tank body.
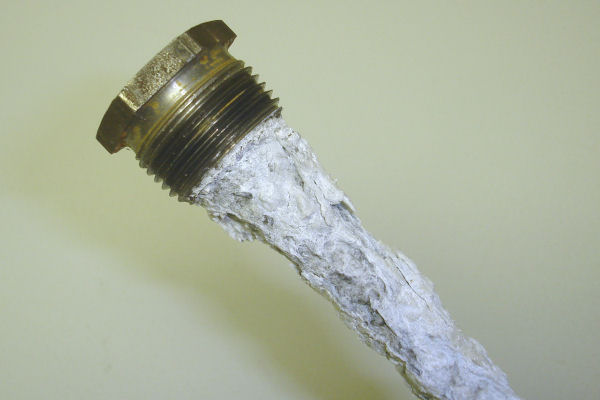
When we finally had it removed it looked as below - rotted away completely - hence the rusty stains we had experienced. Here you see it alongside the new anode before installation. Note that the anodes are perhaps thirty to forty inches in length.
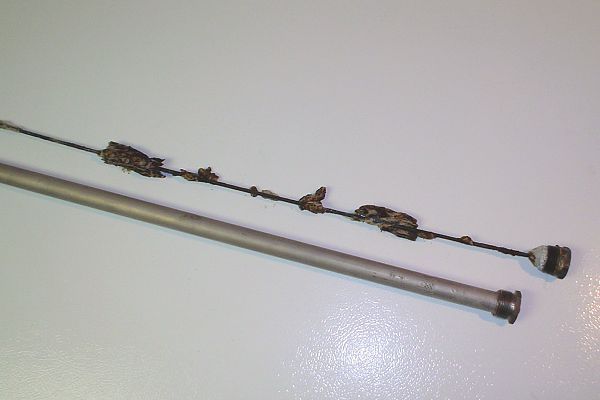
This particular replacement anode is magnesium over a thin steel core. I understand that there are aluminum anodes too that are used under certain water conditions such as heavy mineral concentrations - but don't take my word for that.
To return to that tightness issue in removing the anode - no joking it was tight! I understand that they have just such a reputation. I first had to block the tank to prevent any twisting and my assistant held onto it as well. Perhaps an appliance strap could be considered. Having the tank almost full certainly helps.
I then used a long handled 1 1/16" socket wrench - plus a length of old steel tube as an extension and still it would not move - but the tank was happy to try to spin.
So finally I resorted to a sturdy punch and a few gentle but sharp hammer taps directly around the outer rim of the anode plug. This shock tactic worked and after filing away a few small burrs the anode was readily removed. In addition, I suspect that if the tank - meaning in particular the nut head of the anode - is at all warm from the hot water then thermal expansion is also playing a role in explaining the tight grip of the threads.
A little standard P.T.F.E. Sealing Tape was wrapped on the threads when installing the new anode and the anode was set as tightly possible. Note that the anode must not in any way be electrically isolated from the steel of the tank itself as that would defeat its purpose. The reason for using any sealing tape at all was to (hopefully...) make it a little easier to remove the anode the next time. So in practice the sealing tape is completely optional.
The tank was then completely flushed through the bottom drain, then filled, the power turned on and there is no sign of problems and certainly no recurrence of the rusty stain.
 This page was first added to the "Holmestead" website in 2004. Some twenty-eight months later, in March 2007, the replacement anode described above was in turn replaced using exactly the procedure described. This page was first added to the "Holmestead" website in 2004. Some twenty-eight months later, in March 2007, the replacement anode described above was in turn replaced using exactly the procedure described.
There had been no apparent water problems and so it was considered routine.
It appears that two years would be a better time span for our particular water conditions - so mark the calendar for Spring 2009! Below is what the old 2004 anode looked like in 2007:
|
Disclaimer
The information presented here is for information purposes only. We suggest that you carry out your own research to establish specific details as related to your own equipment and installation. We also recommend that you call upon the services of a professional plumber once you have explained to him or her your requirements by presenting this page. Certain jurisdictions may have bylaws and building codes in place that require the use of such professional services.
|

| The "Holmestead" is located at: |
| 140 Thunder Beach Road, 17th Concession, Township of Tiny, |
| ONTARIO, L9M 0T3, CANADA |
|